Showing posts with label eLearning. Show all posts

Wednesday, December 4, 2013

Automatically determining mobile or computer-based delivery


Moving into a world of mobile versus pc accessed content doesn’t always mean dramatic rewrites of web-content.  Responsive web design helps the content scale to meet the device’s abilities.  However, when working with rapid eLearning development tools like Adobe Captivate and Articulate Storyline, a one size fits all approach isn’t always possible. 


The Challenge
Currently, there is no standard for delivering multimedia across platforms.  Flash still dominates the pc environment, but is absent on mobile devices.  HTML5 is progressing, but isn’t persistent (especially if you are delivering to a corporate environment using browsers from a few years ago).  Rapid development tools are beginning to introduce HTML5 output, but they lack many of the features that are present if those same files are published as Flash.

There’s a need to deliver the best possible learning experience based on the device that the learner wants to use to access the material.  If a user is sitting at a pc with Flash and looking for interactive eLearning, it can be delivered via Flash.  If the user is on the road and looking to access the same content from their mobile phone, it can’t.  In those cases, the device sets up a few more constraints, but they shouldn’t keep the learner from getting to the information they need in the manner she wants to access it. 

A Solution
Clearly not the solution as there are untold other options out there, but this is one possible solution that leverages some simple javascript similar to what we used earlier to determine the appropriate Captivate output size.  Essentially, you’ll provide two versions of the material – one for pc-based users and one for mobile.  You’ll then create a launch file that will determine how they are accessing the material and point them to the appropriate version.

Decision File
In the body of an HTML launch file, you can place the following javascript code that will determine how the learner is accessing the page:
<script>
if(navigator.appVersion.indexOf(“Mobile”)!=-1){
  window.location=”mobile.htm”;
} else {
  window.location=”pc.htm”;
}
</script>

Essentially, navigator.appVersion pulls a string of information about the browser.  The .indexOf portion of the line searches for the word Mobile in the string.  If it is present, it will return the place in the string where it begins (not -1), so we will open the mobile version of the content.  If it is not present, we will open the pc version of the content.

PC File
If you are using a rapid development tool, this one is the simplest – you merely identify the page that is created by the tool.  This will allow you to launch the Flash version with no problems (assuming the pc has Flash on it). 

Mobile File
This one is a bit trickier as you likely have to make concessions about the delivery from what you would have created in Captivate.  There are a couple of options that can make this simple for the developer, but the focus should instead be on creating what is best for the learner on their mobile device, which can often mean duplicative development effort.

Potential output formats include rendering Captivate files as mp4 videos (once you’re removed all interactivity), providing content in an HTML5 output version from the rapid development tool, providing alternate content in pdf form, or even leveraging standard HTML development.  The mobile version doesn’t have to be a lessened experience, it just has to be one tailored to the device.  For example, a PDF with buttons to navigate works brilliantly on an iPad because it feels so natural, but on a PC, it seems a bit lackluster. 

Overall
Unfortunately, at this point, there is still a bit of duplicative effort that is required for the developer (and designer).  However, it provides a much more ideal situation for the learner by allowing them to access the content in which they are interested through the device they desire without knowing there is another possibility.

Wednesday, October 16, 2013

Development Process - Initiation


Over the next few weeks, I’m going to explore the process by which I prefer to develop technology enabled learning products.  While not every project follows this process, it includes the primary elements that I find necessary for a project.  The process will be broken down into two sections: Initiation and Creation.  I’m intentionally staying away from ADDIE and SAM terminology as I find elements of both extremely helpful, but the labels problematic when describing a process that follows neither precisely.

Initiation
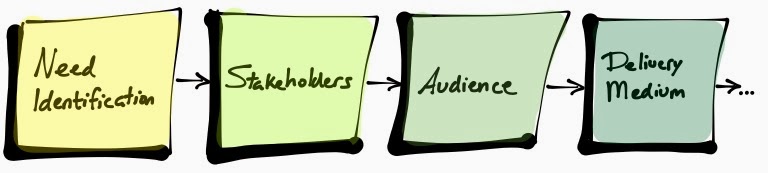
Initiation follows the initial stages of the development process.  While it is sometimes challenging to get excited about the type of work involved in intake and consultation, these steps provide a solid foundation on which the project can be built.  Stages of this portion include: Need Identification, Stakeholders, Audience, and Delivery Medium.
 

Need Identification
Sometimes this is as simple as a call, e-mail, IM, or simple form request saying, “I need you to help me build X.”  Others, it is a learning team identifying a need or a reengineered process requiring training to help people execute it.  Either way, this initial step is crucial as it allows the requestor and developer(s) to get on the same page as to what problem you are looking to solve. 

The outcome of this stage can often be written as a goal or objective.  Whatever learning is produced will help the learners do something different or understand something new. 

Stakeholders
This stage focuses on the people involved in creating the learning and providing subject matter.  While this stage doesn’t define the developers involved – depending on the complexity of the work and the size and skillset of the development team, that is likely done during once the delivery method has been defined – it does help to define everyone else.

The requestor is easily understood, as they are the one coming to the learning team (or they are the learning team themselves).  However, the requestor may also wear one of the other hats.

The subject matter expert or SME is the one who will help the development team to understand the content or process.  She will also help provide periodic reviews and act as a sounding board as things are created to ensure they are accurate.  The SME is somewhat of a double-edged sword.  While she provides information to you that helps you throughout the process, she is also likely the most knowledgeable – which may include shortcuts, tribal knowledge, and respect as the expert in the area that she may not want to lose.

The process owner is also crucial.  Depending on the type of work, the process owner may also be the SME, but others, the process owner could be a step removed, knowing how everything should work on paper, but never actually doing the work.  This person can provide a good balance with the SME as one understands the ideal state and the other reality.

Finally, the approvers are essential to define as they can make or break a project.  While others may be approvers, often approvers reside in upper management.  In those cases, the developer is often left relying on the relationship between the SME, process owner, and requestor with the approvers.  Periodically, the developer is included in the meetings with the approver to get buy in, understand their points of hesitation, or help to explain or ideate to create solutions based on their hesitations.  In addition to understanding who will work with the approvers and getting an idea of how the approver likes to work, it is helpful to get an understanding of the timeline necessary when working with this particular approver.  Some will drop everything and review every word of a storyboard while others will leave the project gathering dust in their inbox while they tend to production issues.  This knowledge will help to create a realistic and manageable timeline.

Audience
Similar to the Stakeholders, the audience is all about people.  Falling into the Analysis stage of ADDIE, this step helps to get an understanding of the audience as well as their environment.  In addition to getting a handle on their prior knowledge and learning preferences, it is important to see examples of their prior learning content in order to better understand what they are used to seeing.  Whether your development looks similar or not, at least this will help you know what they have seen as “normal” so you can better guide them with what you create.

While knowing the people is important, it is also essential to understand their technology expectations.  If these individuals are used to synchronous meetings or huddles, that can influence the delivery method.  If they don’t have access to a computer, or have access to a computer only periodically, those are things to consider.  If you are dealing with an audience that doesn’t have access to your network or LMS, it will influence the type of material you can deliver to them.  Additional questions to ask include those related to audio options, bandwidth, and plugins (like Flash).  Beyond typical tethered computers, there is also the potential that they will be using mobile devices to get to content.  Do those devices connect in an expected manner to your delivery channel?  Are they personal devices with security limiatations?

Getting a better understanding of the people taking the learning, their prior experiences, and the technology that enables their learning are key to creating a successful learning engagement.

Delivery Medium
This stage is a combination of the outputs of the prior stages.  Knowing what the requestor initially indicated they would like – rarely do they come to the table asking for the best learning intervention – as well as the delivery method that supports the content and objectives themselves, selecting the proper delivery medium is key.  The Audience (individuals and technology) and types of tracking, reporting, and assessment necessary will all help to influence the delivery medium.  This step is also the one where it may be identified that it isn’t a true learning need, but rather an awareness need.  For some, that can indicate the conclusion of the engagement, but for others it merely helps to drive to a specific type of delivery and tracking.

Once the delivery medium has been defined, the development team can be identified.  Of course, this assumes that you have the ability to grab the particular players necessary for graphics, video, interactive eLearning, etc – otherwise, it just lets the lone developer understand the types of work that will be done throughout the project. 

Next week, we’ll explore the Creation stages that follow the above Initiation stages.

Wednesday, November 14, 2012

Making SCORM Calls from Flash (AS3)


If you are using a learning management system (LMS), chances are you can communicate with it using SCORM commands.  While many rapid development tools like Captivate and Articulate will automatically generate SCORM calls, they don’t provide you the flexibility and precision that can be necessary with eLearning module development.  In those situations, Flash is (still) a viable option.

If you are comfortable building a module in Flash, doing some light coding in ActionScript 3 (AS3), then the SCORM commands will simply be plug n play.  In this situation, it is more important to know when and how you should be making your SCORM calls as opposed to what the code will be. 

While there are a variety of calls that can be made (outlined in the ADL’s SCORM 1.2 Run-Time Environment), they fall into three primary categories: set, get, commit.  Some basic examples are detailed below, but the link above provides the full range of calls that can be made as well as specific keywords and values that are required for each type of variable used.

Set
To set a SCORM variable on the LMS:
fscommand(“LMSSetValue”, “cmi.core.lesson_status,completed”);
All set commands follow the same pattern.  The only thing that changes is the API call (cmi.core.lesson_status) and the value that you are looking to set (completed).  The fscommand has two variables.  The first string lets the LMS know you are interested in setting a variable.  The second string combines the API call and the value you are looking to set separated by a comma.  This can be done with a string (as defined above) or with a variable (intScore is the variable):
fscommand(“LMSSetValue”, “cmi.core.score.raw,”+intScore);
You can see in the example above that it is still two strings that are included in the fscommand, but the second string is concatenated between a literal and the variable intScore.

In addition to setting variables at the conclusion of a module, you should also potentially set the completion status at the beginning of the module.  However, rather than simply setting the variable, you will need to first get the completion status to ensure you aren’t overwriting a status of completed.  A module is initially ‘not attempted’, but once the learner begins the module, it should be modified to read ‘incomplete’.  Rather than making this SCORM call upon entry to the module, you would first get the current status to ensure it wasn’t previously completed before you reset it to incomplete. 

Another variable that is set throughout the module and retrieved at the beginning manages the bookmark.
fscommand(“LMSSetValue”, “cmi.suspend_data,”+stringBookmark);
The bookmark is a (maximum) 4096-byte string.  As such, you can include a variety of information about previous interactions with the module.  Leveraging a character within the string such as the pipe character (|), you can include a variety of information that can later be separated into an array and read in a logical way to return the module to the previous state. 

Get
A get API call works very similarly to the set call:
fscommand(“LMSGetValue”, “cmi.core.lesson_status,returnedStatus”);
In the case above, the LMS will return the status previously stored and set it as the value in the returnedStatus variable. 

While set variables are the simplest, get variables are the most powerful differentiator between a Flash module and a Captivate module.  While Captivate can set variables, it is very difficult to determine if the variable has successfully been set and to what value.  For example, at the conclusion of a module, you indicate that the completion status has been recorded.  However, in Captivate, you are making that statement based on an assumption.  Using Flash, you can set the completion status, then use a timed interval to check to ensure that you can get the same status that you believe should have been set by the LMS.  This will help to ensure you don’t have latency issues as you can refrain from communicating with the learner until you have confirmed (with a get call) that the LMS has the correct value stored. 

In addition to the fscommand, you also have to set up what happens when the variable is returned.  As such, you’ll need to add the following code:
ExternalInterface.addCallback(“SetVariable2”,mySetVariable);
function mySetVariable(varname:String, varvalue:String):void {
this[varname] = varvalue;

}
Here, the variable name that you set in the original fscommand is passed back with varvalue set to the value that is returned. 

this[varname] differs from this.varname in that whatever is the value of varname is the name of the variable name that is set.  For example:
varname = “returnedStatus”;
this[varname] = “completed”
// is the same as saying
this.returnedStatus = “completed”;

Here is a full example:
var returnedStatus:String;
// get the status at the beginning of the module
fscommand(“LMSGetValue”, “cmi.core.lesson_status,returnedStatus”);
// process the returned information from the javascript
ExternalInterface.addCallback(“SetVariable2”,mySetVariable);
function mySetVariable(varname:String, varvalue:String):void {
this[varname] = varvalue;
if(varname== “returnedStatus”) {
// only execute the code if we are getting the status
if(varvalue == “completed”) {
// already completed, so do nothing with the stauts
} else {
// set to incomplete since haven’t completed yet
fscommand(“LMSSetValue”, “cmi.core.lesson_status,incomplete”);
}
// we’ve successfully gotten something back, so show the next button
nextButton_btn.visible = true;
}
}

Commitment
When setting variables, depending on the LMS, they may or may not immediately perform an API call to the LMS.  The advantage of the call happening immediately is that the transaction has occurred.  The downside is that setting a handful of variables requires frequent calls between the module and the system.  Instead, many LMSs require a commitment statement to push all of the set variables to the LMS.
fscommand(“LMSCommit”, “”);
That simple statement tells the module to send everything that has been recently set to the LMS.  If you limit the amount of set calls, you can execute this command after each to ensure the variables aren’t waiting in the module in case of an unexpected termination of the program. 

How to Publish
While the fscommands are simple, there are a couple of other steps to ensure the javascript is properly placed in the html files associated with the module.  The most crucial part of publication is to tell Flash that you wish to publish the HTML as:
Flash with SCORM 1.2 Tracking
This will add the proper javascript functions to the HTML page to ensure that the fscommands are passing the information to something that will then interact with the LMS. 

The more difficult change is one that is required for the ability to get variables.  Flash, unfortunately, needs one of the HTML functions renamed in order for the return calls to function correctly.  By default, line 322 of the HTML page states
If ( cmd == “LMSGetValue”) {
SCORM_demoObj.SetVariable(arg2, SCOGetValue(arg1));
Here, you can see how the arguments passed through fscommand get placed into the function to make the actual call.  However, SetVariable is a function that is used twice.  As such, it should be renamed to SetVariable2(arg2… resulting in:
If ( cmd == “LMSGetValue”) {
SCORM_demoObj.SetVariable2(arg2, SCOGetValue(arg1));

Once you have mastered setting and getting SCORM variables, you will find that you can create valuable tracking that allow you to not only record how learners are interacting with your module, but also provide them a more positive, consistent experience where they know what is happening with the system and aren’t surprised that things didn’t get set as planned.