One of the new features of Apple’s upgraded
iOS is an Accessibility option that allows you to lock a device on a single
app. This can be advantageous when
dealing with students who need to remain focused, letting your kids play with a
device, or in a situation where you want to prevent people from wandering about
your device.
To lock your device, you must first enable
Guided Access through your settings. To
enable the feature go to: Settings >> General >> Accessibility
>> Guided Access. When you enable
Guided Access, you will also set a password (similar to locking your device).
Once you have entered the application in
which you would like to lock the device, simply triple click the home
button. This brings up the interface to
lock into the app as well as the ability to lock certain portions of the
screen. Locking portions of the screen
can be helpful if you want to disable certain options. For example, if you want to lock someone in
Safari on a web form and want to prevent them from accessing the URL, you can
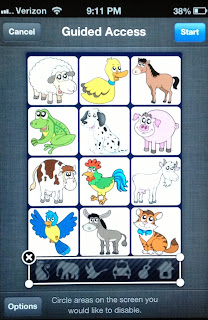
disable the upper portion of the screen. In the image to the right, the lower portion of Sound Touch is blocked to prevent a child from viewing the other types of sounds.
Although it is a simple feature, you can leverage
it to keep a child locked into a single application and away from the others on
your device. It can also be used if you
are using a few iPads as part of a station during work in your classroom to
help keep students on task while you are focused on other students in the
class. It certainly beats having to use
physical blocks such as binder clips or credit cards in a case to prevent the
use of the home button.
If you happen to lock yourself in Guided
Access mode, you can hold power and the home button for 15 seconds to force
reset your device. This will enable you
to go back into the settings and disable the feature or reset the password to
something you’ll remember.

No comments:
Post a Comment